 This is the testing phase of my embroidery plans. I'll probably adjust it a little from this, but this is a rough start for the sleeve embroideries. I have not tested the second diagonal pattern (which is simple) nor the round symbols around the neckline etc etc. I also need to figure out how to do the decorated seams.
However! I just bought some silver sequin spider web sheer fabric from Joann's and now I'm all a-buzz about what my halloween outfit is going to look like. I have a spider web sheer jacket with a peplum and dangling sleeves from Hot Topic circa 2000, and I'm going to make a sheer overskirt with the new fabric and a black long slip or dress. Maybe if I get off my butt and do it soon, I can do silver spider details along the skirt too!
Of course, I have all of these embroidery plans, but who knows how much I'll actually want to do that considering my student and I will be working on her senior collection this year and MUCH of it will be embroidering bugs onto sheer and see-through jackets and skirts. So, we shall see!
This is the testing phase of my embroidery plans. I'll probably adjust it a little from this, but this is a rough start for the sleeve embroideries. I have not tested the second diagonal pattern (which is simple) nor the round symbols around the neckline etc etc. I also need to figure out how to do the decorated seams.
However! I just bought some silver sequin spider web sheer fabric from Joann's and now I'm all a-buzz about what my halloween outfit is going to look like. I have a spider web sheer jacket with a peplum and dangling sleeves from Hot Topic circa 2000, and I'm going to make a sheer overskirt with the new fabric and a black long slip or dress. Maybe if I get off my butt and do it soon, I can do silver spider details along the skirt too!
Of course, I have all of these embroidery plans, but who knows how much I'll actually want to do that considering my student and I will be working on her senior collection this year and MUCH of it will be embroidering bugs onto sheer and see-through jackets and skirts. So, we shall see!
Monday, September 5, 2016
New Projects as Always :)
I realize that the last post I made was talking about the vyshyvanka that I want to make. It's still a plan (I bought a bolt of linen eeee! :D) but I have every intention of it being a winter project. I'll also make a shirt or two for my husband out of the linen. It's a little sheer, so I'll have to see how to get it so that I don't need a slip underneath as that'd be a pain in the butt.
 This is the testing phase of my embroidery plans. I'll probably adjust it a little from this, but this is a rough start for the sleeve embroideries. I have not tested the second diagonal pattern (which is simple) nor the round symbols around the neckline etc etc. I also need to figure out how to do the decorated seams.
However! I just bought some silver sequin spider web sheer fabric from Joann's and now I'm all a-buzz about what my halloween outfit is going to look like. I have a spider web sheer jacket with a peplum and dangling sleeves from Hot Topic circa 2000, and I'm going to make a sheer overskirt with the new fabric and a black long slip or dress. Maybe if I get off my butt and do it soon, I can do silver spider details along the skirt too!
Of course, I have all of these embroidery plans, but who knows how much I'll actually want to do that considering my student and I will be working on her senior collection this year and MUCH of it will be embroidering bugs onto sheer and see-through jackets and skirts. So, we shall see!
This is the testing phase of my embroidery plans. I'll probably adjust it a little from this, but this is a rough start for the sleeve embroideries. I have not tested the second diagonal pattern (which is simple) nor the round symbols around the neckline etc etc. I also need to figure out how to do the decorated seams.
However! I just bought some silver sequin spider web sheer fabric from Joann's and now I'm all a-buzz about what my halloween outfit is going to look like. I have a spider web sheer jacket with a peplum and dangling sleeves from Hot Topic circa 2000, and I'm going to make a sheer overskirt with the new fabric and a black long slip or dress. Maybe if I get off my butt and do it soon, I can do silver spider details along the skirt too!
Of course, I have all of these embroidery plans, but who knows how much I'll actually want to do that considering my student and I will be working on her senior collection this year and MUCH of it will be embroidering bugs onto sheer and see-through jackets and skirts. So, we shall see!
Friday, July 22, 2016
New Project
So in my love of the 1920s and linen, I discovered that embroidered linen dresses was a really common theme in the past 100 years, not just the 1920s. However, you get into racist overtones. Whether it's the Mexican version of the embroidered dress, or the "gypsy fashion!" Romani version of the embroidered dress, you see a lot of "I'm a white tourist in your country who wants to buy your shit". And then I discovered/re-remembered that Slavic style was ALSO considered "exotic" in the 1920s. Enter the Вишиванка. (N.B. I haven't installed Cyrillic alphabet keyboard on this comp, so the rest will be Roman alphabet.)
The Vyshyvanka is the traditional embroidered shirt or chemise in Ukrainian national costume.

 As I have Ukrainian heritage, I feel comfortable wearing a Ukrainian embroidered garment. Because I am cheap, insane, and talented, I of course want to make it. This has meant research.
Research into what embroideries are common, what stitches are common (answer: it's VERY VERY regional). Research with very little information as to where my Great Grandfather came from (I got diddly on my Great Grandmother, not to mention it was her PARENTS who immigrated). I have my Great Grandfather's original name before Ellis Island. That... helps very little. Apparently his first name is a common Rusyn name (from Transcarpathian region of Ukraine, Slovakia and Romania). Apparently variation of his last name are from either Slovakia or Austria. Apparently he was BORN in Austria, but identified as Ukrainian. All of these little bits of information has meant that I will be basing my embroidery off of the Bukovyna area in Ukraine.
Bukovynian Vyshyvanka look like this:
As I have Ukrainian heritage, I feel comfortable wearing a Ukrainian embroidered garment. Because I am cheap, insane, and talented, I of course want to make it. This has meant research.
Research into what embroideries are common, what stitches are common (answer: it's VERY VERY regional). Research with very little information as to where my Great Grandfather came from (I got diddly on my Great Grandmother, not to mention it was her PARENTS who immigrated). I have my Great Grandfather's original name before Ellis Island. That... helps very little. Apparently his first name is a common Rusyn name (from Transcarpathian region of Ukraine, Slovakia and Romania). Apparently variation of his last name are from either Slovakia or Austria. Apparently he was BORN in Austria, but identified as Ukrainian. All of these little bits of information has meant that I will be basing my embroidery off of the Bukovyna area in Ukraine.
Bukovynian Vyshyvanka look like this:
 The bulk of the embroidery is on the sleeves, which is in three sections. A horizontal pattern on top, a monochromatic (and usually pale) band in the middle, and diagonal or vertical stripes toward the wrist. There are vertical bands alongside the front opening and the neckline, and occasionally a band near the hem. The embroidery patterns I'm going to use are based off of these two images:

 However, in my practice efforts at embroidering, the middle band, which uses a stitch called morshchynka, is my least favorite embroidery stitch ever.
 I find it difficult to use and unwieldy. Oh well. We shall see how it goes.
Wednesday, July 13, 2016
Middle of the Night Wedding Dress Update
So sewing the pleats down took more like 3 or 4 hours. Attaching the crin took more like an hour and a half. I'm halfway done with folding up the hem, but I'll also need to go back through and keep the up-fold of the hem tacked down (long story short, due to wonkiness with the hem length, it's a three step process instead of a two step process. boohoo me).
I have ten hours before my client picks it up. And I am burnt out for now. I'm finding it difficult to soldier on. (And I literally could not open my eyes this morning for my intended morning sewing.) Looks like it's bed and an early morning for me. There's NOT much to do, but it just feels never ending.
Blargle.
Monday, July 11, 2016
Wedding Dress Update
My client had final fittings today. The bad news is: it doesn't fit perfectly out of the box. The good news is: it's too BIG. Which is totes manageable.
So what I have left to do before she picks the dress up on Wednesday noon:
-- tack down the new pleat positions, < 1 hour
-- adjust the fit at the very top, 30 mins
-- attach crin to the bottom, < 1 hour
-- hem, 45 mins
-- attach inner facing along top, 1 1/2 hours
-- attach button and buttonhole tab above zipper, 30 mins
-- add additional hook on halter, 10 mins
So yeah. Very do-able. Very good news. IT'S ALMOST DONE :D
Wednesday, June 29, 2016
Sewing Updates
I am awaiting boning tips which should come in tomorrow. I should have ordered them ages ago, but stupid me as usual kept forgetting.
This was my last to-do list for the wedding dress:
To Do Before Saturday:
-- iron fabric
-- trace out pattern on silk
-- trace out pattern on cotton
-- finish seam allowances
-- cut out silk
-- cut out cotton
-- flat line cotton to silk
-- grade seam allowance
-- zigzag finish seam allowance
-- flat fell lining together
-- put in boning casing
-- put in boning
-- fully finish the halter straps
-- deal with tulle
-- zipper??
It is now at:
-- iron fabric
-- trace out pattern on silk
-- trace out pattern on cotton
-- finish seam allowances
-- cut out silk
-- cut out cotton
-- flat line cotton to silk
-- grade seam allowance
-- zigzag finish seam allowance
-- flat fell lining together
-- put in boning casing
-- deal with tulle
-- iron outer fabric
-- fully finish the halter straps
-- figure out hem circumference of outer fabric
-- pin pleating attempts
-- cut out pieces for outer fabric
-- zigzag cut edges of outer fabric
-- french seam along panels and gores
-- cut and tip bones
-- put in boning
-- edge neckline with fashion fabric
-- pin pleating along hipline
-- pin pleating along neckline
-- confirm that the measurements work
-- stitch pleating in place
-- set zipper
-- attach hook and eyes
-- figure out hem length on Fluffy
-- hem lining
-- hem outer fabric with horsehair braid
Most of what remains is hand work. I can hem the lining with the machine, but everything else is handwork. Which, I rather like. Honestly, I've been enjoying my work on Fluffy's dress, as it's a puzzle to figure out, and it feels much like my work with Y, in terms of "not my project so it's kinda interesting". Also the amount of handwork is much higher than I usually allow myself for my own projects.
Speaking of my own projects, I meant to do a fair amount of work on the bridesmaid dress today, as I couldn't move forward on the wedding dress without bone tips. What did I accomplish? Ironing the silk habotai, washing and drying by way of the iron my lining fabric, and unpicking the curtain hems someone had hilariously terribly sewn into said lining fabric. Oh, and a quick burn test of the lining fabric. It appears to be mostly cotton, with perhaps a little poly added. Something WAS bubbling, but it nearly burned cleanly away. What I still have to do on that:
-- double check pattern
-- trace pattern onto silk
-- trace pattern onto cotton
-- add seam allowance
-- cut out silk
-- cut out cotton
-- hem cotton
-- flat line cotton and silk
-- trim seam allowances down evenly
-- zigzag edge seam allowances
-- sew darts
-- sew seams
-- finish neckline
-- finish armscye
-- install zipper
-- figure out pattern for bolero and ruffles
-- iron silk chiffon
-- trace bolero and ruffles onto silk
-- add seam allowance
-- cut out silk
-- zigzag edge
-- attach ruffles
-- attach bolero
-- make big flower for shoulder closure
I'm just not enthused about making this stupid bridesmaid dress. I'm just not particularly enthused about anything involving this wedding. We have the bachelorette party this weekend, and then only a week and a half away is the wedding itself. I'd much rather be sewing the wedding gown that I'm getting paid for, than the bridesmaid gown for a wedding that continually demands monetary support from me.
Thursday, June 23, 2016
Wedding Dress Update
I am finding it difficult to keep pushing through working with the silk habotai for the lining. It shifts and wiggles under my ruler and so I can only draw lines 1-2" long at a time. I traced out and added seam allowance for the stability layer (cotton) in 15 mins flat. I've been working on the silk for a few days.
It wearies me. I have 3 more pieces to retrace (because chalk fades while working) and add seam allowance to before I cut it out. Once I have the two layers flat-lined, the silk should behave. But I have to get it there. AND be careful while flatlining to not have the silk shift its grain.
To Do Before Saturday:
-- iron fabric
-- trace out pattern on silk
-- trace out pattern on cotton
-- finish seam allowances
-- cut out silk
-- cut out cotton
-- flat line cotton to silk
-- grade seam allowance
-- zigzag finish seam allowance
-- flat fell lining together
-- put in boning casing
-- put in boning
-- fully finish the halter straps
-- deal with tulle
-- zipper??
Luckily, I had a piece of periwinkle blue cotton THE PERFECT SIZE to use as the stability layer. Seriously, I have had magical luck with fabric lengths. I also had given my client the perfect number for the lining fabric. And this is "fits perfectly without magic tricks to eke out more space". It's a stress-free "fits perfectly".
Tuesday, June 7, 2016
New Clarinet!
So my friend was getting rid of his clarinet. I said "sure, I'd love to have it -- maybe a student would need it". Well, maybe with a little fixing up it could be better than my normal clarinet! It's a wooden Bb Evette & Schaeffer, made in France by Buffet-Crampon. It's a little hard to read the serial number chart, but this instrument was made either in the mid-50s or mid-60s.
It's a little gunky and sticky now, but hopefully my repair guy will get it working as right as rain. I'd also like to get another case for it, as it's in a double case and I don't need that.
I also will need my repair guy to tell me how much it's worth so I can add it to my instrument insurance! I think I'll need to up my policy if I add this new clarinet and the 12-bass accordion I recently purchased.
Also, my friend gave me his stereo speakers. :) I'm very excited, for all that I won't use them in this apartment.
(Haha, after handling the clarinet, my hands smell like old-instrument.)
Monday, June 6, 2016
Nostalgia
There's that thing about teenage summers, I don't know what it is but they are golden in the remembering, like most things, but there's something particular about those summers so that I keep trying to work on stories about it and them and very specific locations that I was only in for a moment compared to all the other places in life. I haven't been back in about ten years, and since then I've spent a lot of time (for whatever reason) picturing and thinking and writing about silly things like the walk to the beach where we stay.I disagree with this writer wholeheartedly. Teenage summers? 50% of them I was working. The other ones? Not. memorable. at. all. Except, actually, I do recall this: being really upset and surprised that I was BORED THE ENTIRE TIME. I remember feeling like "what the heck? Summers used to be the best! Why is this so shitty?" I think if you want cozy nostalgia, head back to elementary school. When everything that you learn makes the world a more interesting place. Where the cruelties of children are solvable by hitting them on the sly. And they hit you back and you both get time out. When I think of some of the worst times in my life, they were pretty much all teenage years. Not that my 20s haven't had their shitty times. But gimme the single digit years. Before I wanted to grow up and move out, which is what I spent ages 10-19 doing. Hoping that every tomorrow was better than today. And not changing anything, so the tomorrow turned out just the same. I don't miss my teen years. I am happy to have them behind me.
Monday, May 16, 2016
Bridesmaid Dress
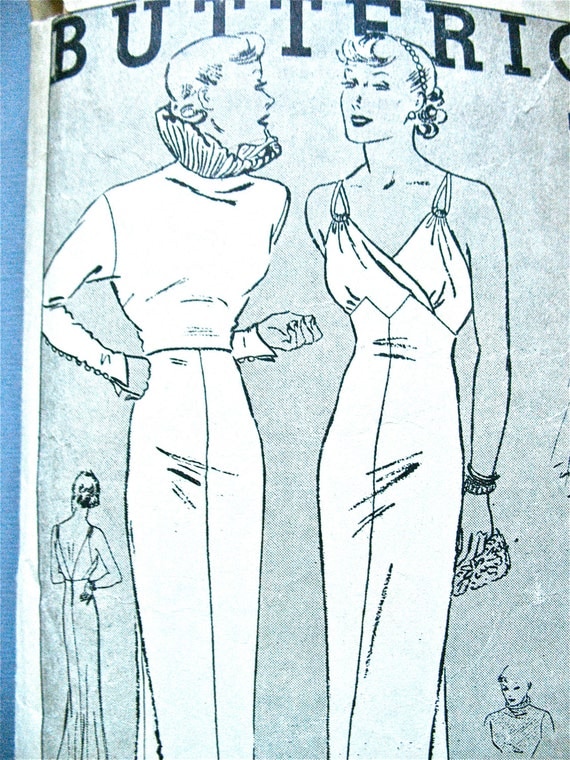
I am a bridesmaid for my good friend L. We are at less than 2 months until the big day, and I need to get off my butt and make a bridesmaid dress. When I asked what she had thought for the dresses (there are SIX of us), she sent me a picture of a color. Dark teal. Guess what color isn't popular for early summer?
(*sigh) It's a beautiful color, but difficult to find at the moment. But I ordered some fabric from Denver Fabrics, and am working on a pattern. I believe I'm going to use this 20s dress:

 I'm going to use view A, and have a side zip and a clasp on the left shoulder, so that the whole top of the gown will open up. I'm going to have the undergown be more of a sheath than shapeless, and I will use the little flounces as is, but with a sheer. I'm hoping it'll be cute and fluttery. But I'm going to make a wearable muslin and we shall see!

 I'm going to use view A, and have a side zip and a clasp on the left shoulder, so that the whole top of the gown will open up. I'm going to have the undergown be more of a sheath than shapeless, and I will use the little flounces as is, but with a sheer. I'm hoping it'll be cute and fluttery. But I'm going to make a wearable muslin and we shall see!
Household Work
This past week, I had cleaned out the studio in preparation for a new theory student on Wednesday. Wednesday morning, my landlord knocked on the door and said that in 10 minutes, someone would need roof access. Now, the roof access IS in our apartment, yes, but it's behind the piano. This necessitated my moving EVERYTHING in my studio over so the door was accessible. (And after all that, the tech looked at the horrible, blocked over hole at shoulder height and said "... I'll go through the skylight")
Now everything was EVERYWHERE. And since my shiny new theory student cancelled his lesson that day, I have spent several days doing a complete re-organization and clean of the studio and the back stairs. Just in time for summer and airing everything out!
It's glorious! And of course, I just HAD to take a little time to make some quick projects!
Enter, my two new furry couch pillows! I have had an overabundance of fake fur chilling in my stash for many years now, and I have wanted to have some fake fur pillows to go with the duck head for a while now. And now I do! We have enough pillows on the couch finally!
And just think, this all happened because of a 10 minute warning that I needed to unblock a door! :-D
Friday, May 6, 2016
Friday Morning
There's something very comforting in putting on an album, and carving reeds. I've needed to do so for a long while, and I tied and did initial scrapes on 7 reeds (2 of which broke under the initial scrapes :-P). 3 for me, 4 for my students. As I have a concert tonight and a concert tomorrow, I really need reeds that function at more volumes than mp.
Friday, March 11, 2016
Sewing Thoughts
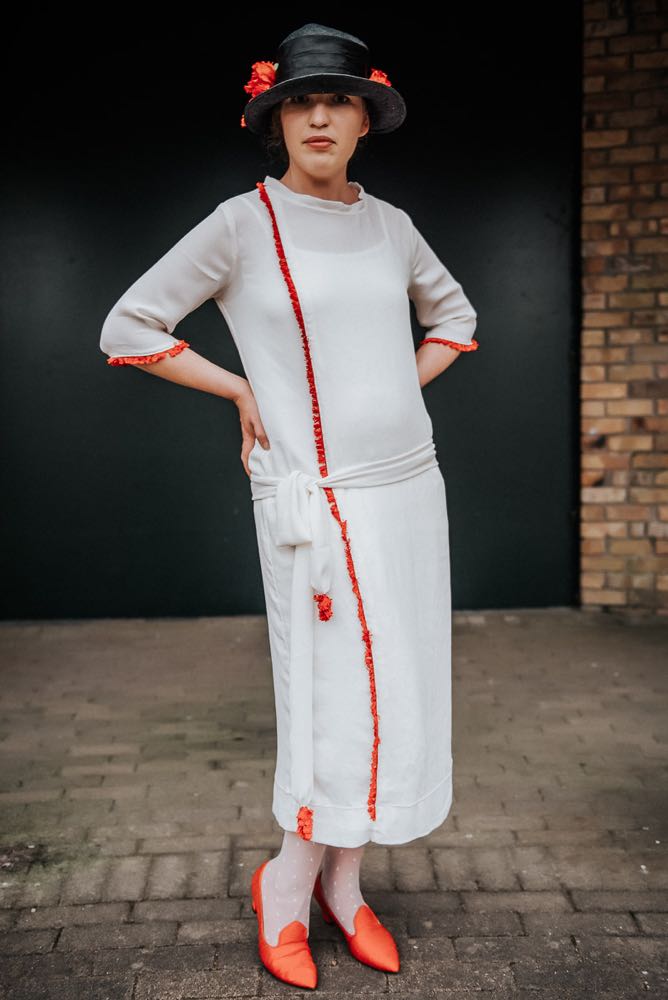
So I am super desirous of a 30s style slip. And maybe a nightgown. Tap pants? I just want silky decadent underthings. So here are some inspo:
Firstly, a 20s dress that the Dreamstress made that I desperately want for this year's 20s linen dress.
 And the lingerie:

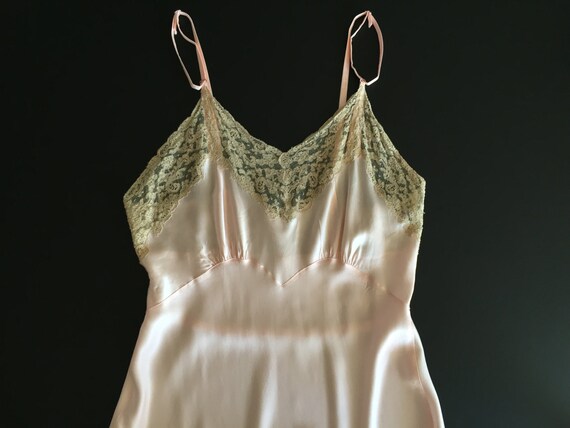
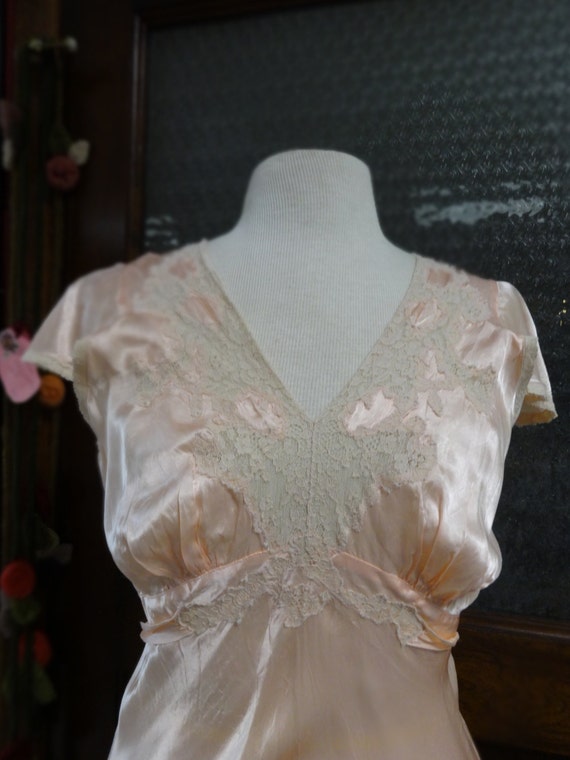
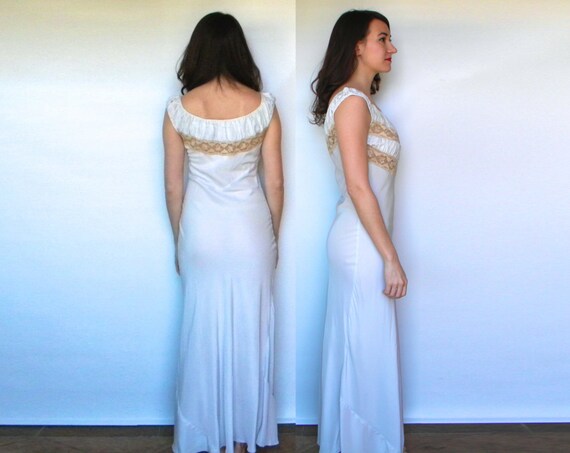
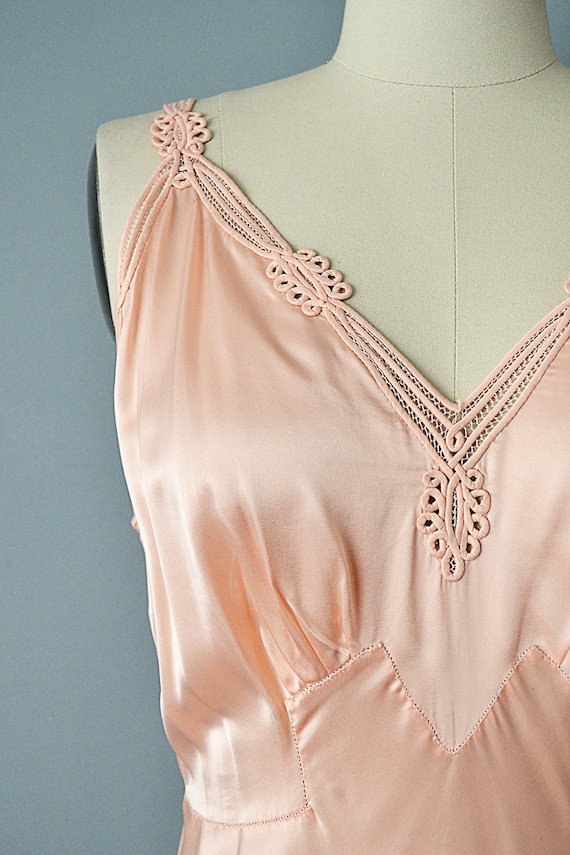
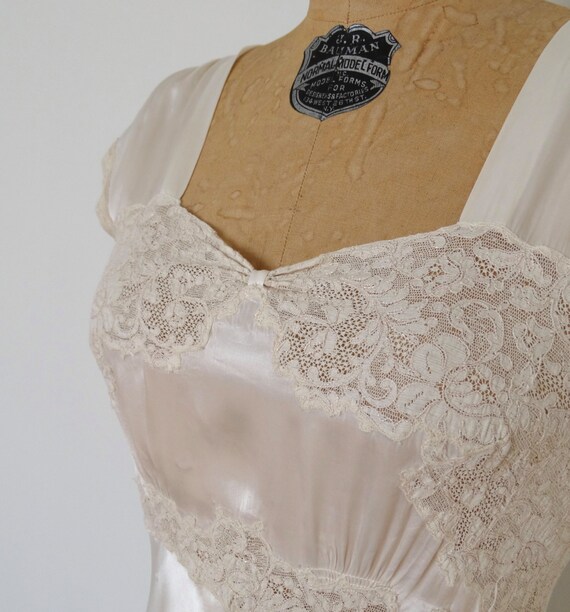
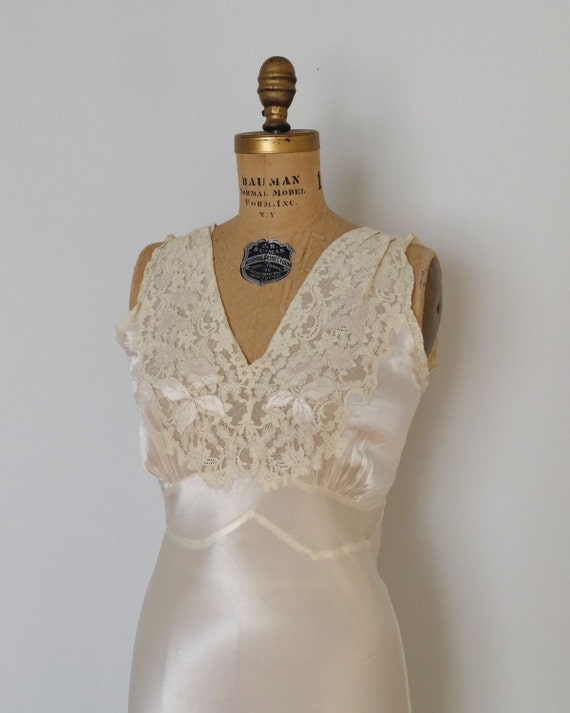
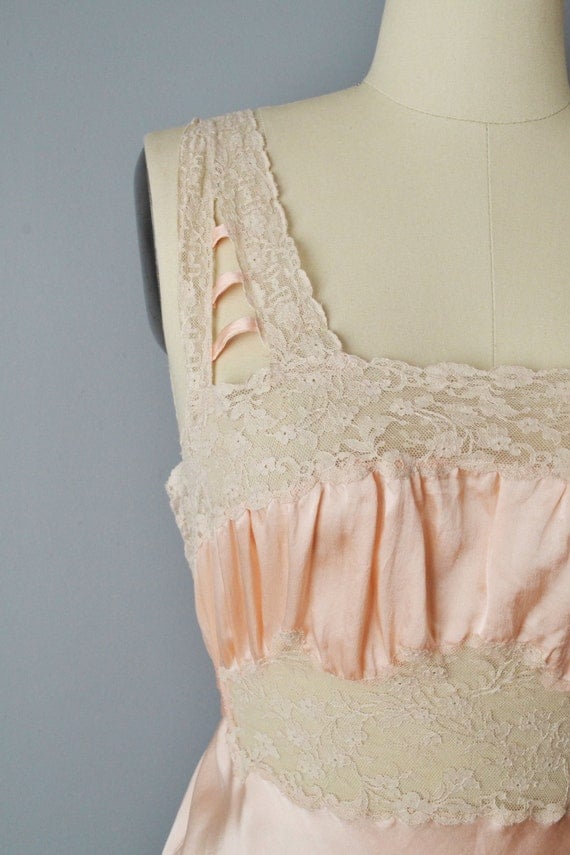

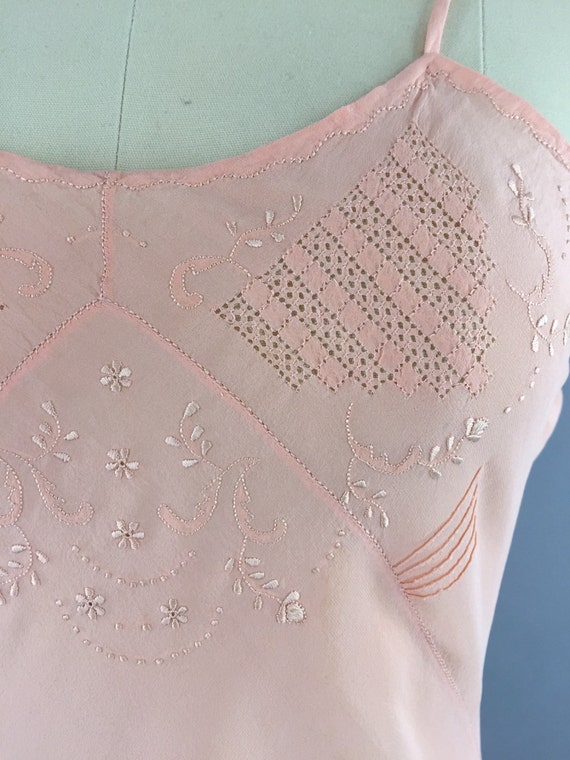
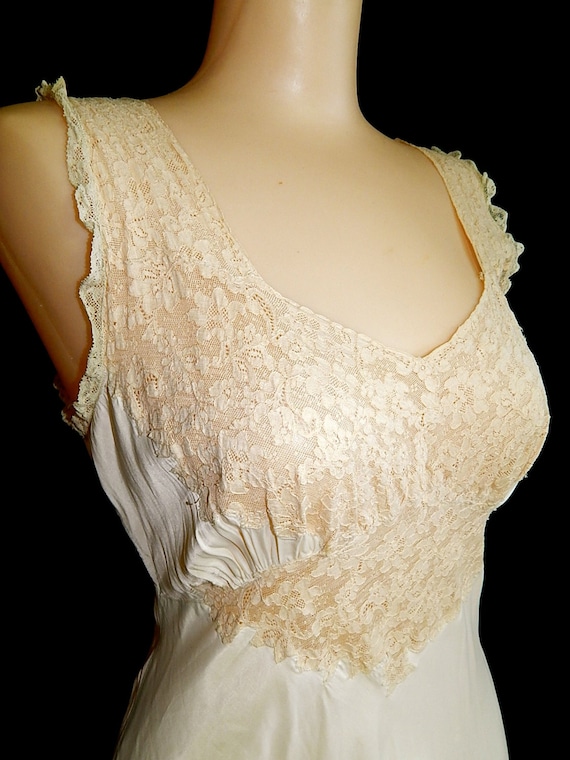
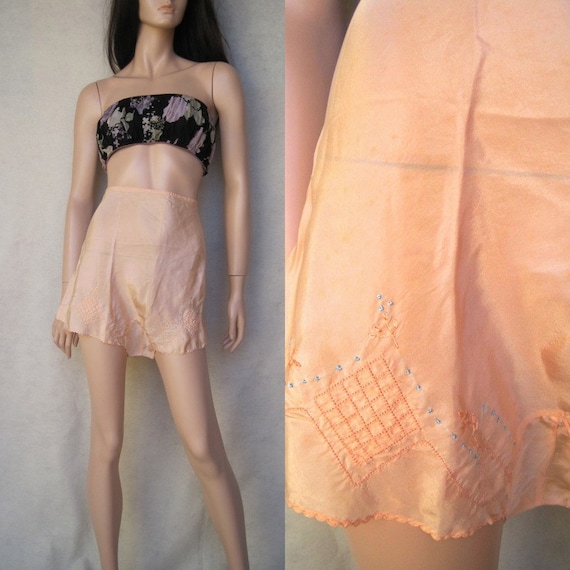

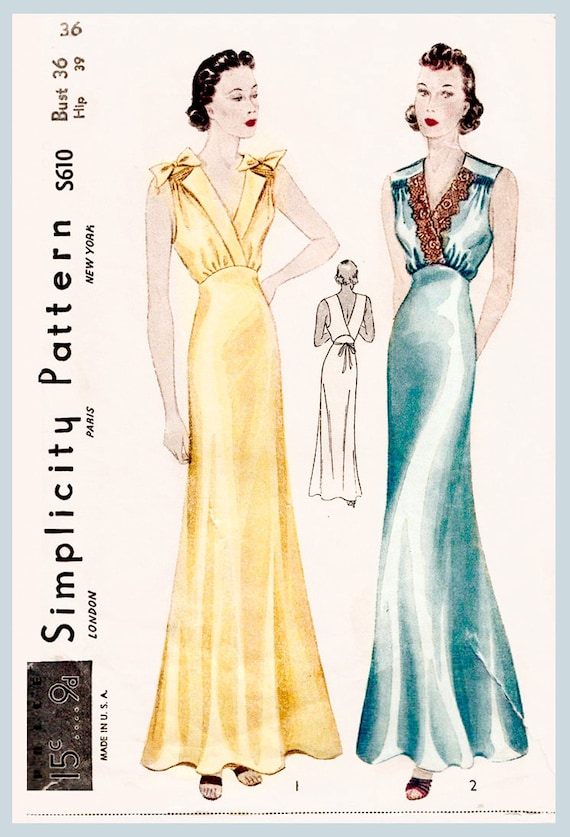
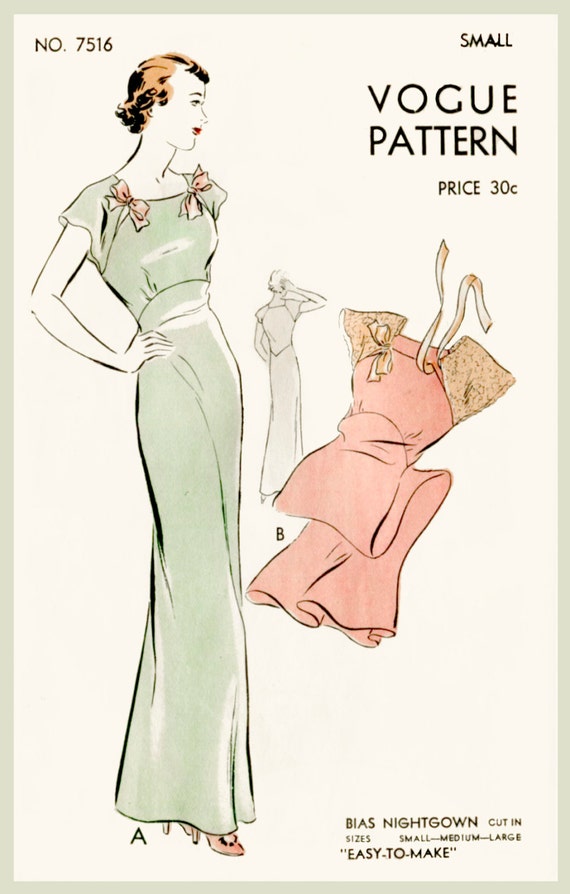
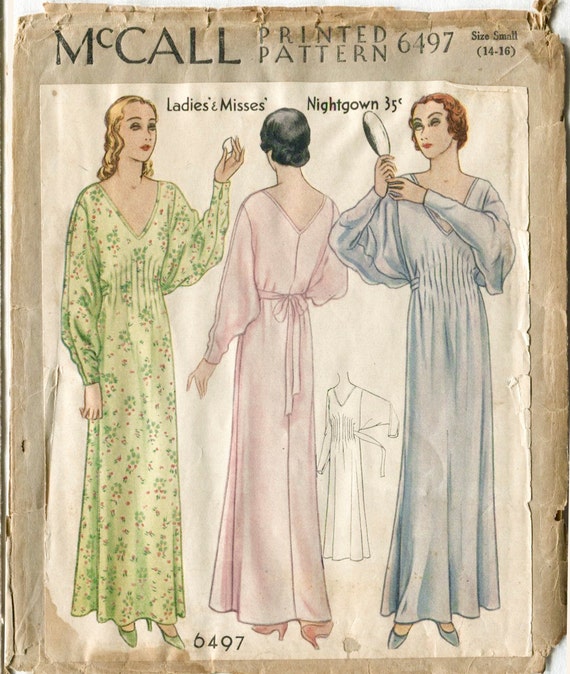
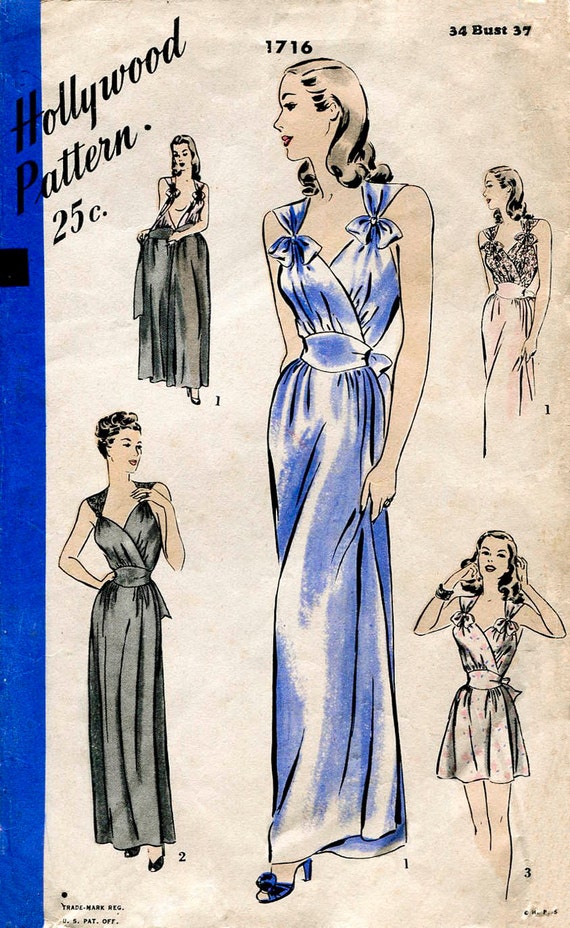

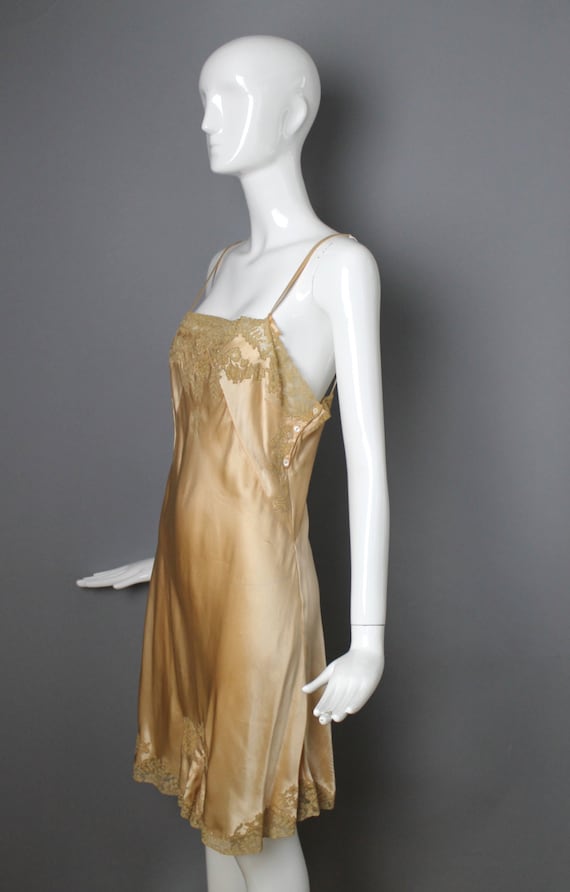
And the lingerie:
Monday, March 7, 2016
This'll Probably Be Awkward
... but I'm going to see my Great Aunt tomorrow. I haven't seen her since 1998. She didn't remember me. She said, "what do you think is my relationship to you?" I said, great aunt. She said "you must be mistaken." I said, I got your number from my Aunt C H. "Ooh, I DO keep in touch with her... what's your relationship to her?"
She's 96 and I haven't seen her in 20 years. I am far from offended. :-P She agreed that we probably were related she just didn't remember me. We set up a time for lunch, I got the address, and she asked if she could write down my name. It wasn't until I said my last name (her sister's first husband's last name) that she went "OOOOH. I haven't thought about that family in many years! Oh that's who you are?"
I figure, if I'm only in the DC area every 20 years, it rather behooves me to visit the only family I have in this area! Here's hoping it goes well.
Friday, March 4, 2016
HFF: Roasts
5. Roasts (February 26 - March 10) They’re a staple of the historic table, in many different shapes and forms and types. It’s also a cooking technique. Try a historic recipe for a roast, or a recipe that involves roasting, and tell us how it turned out.
I picked up a Lamb Belly at my butcher's yesterday. (My husband and I are trying to reduce the high-methane-producing animals in our diet - so beef and pig are out.) Never having cooked this cut, nor much lamb at all, I asked the butcher what she recommended. Apparently, some people roast it, some people braise it, some people fry it on high heat and slice it thin. Roast! Well, that caught my ear, as I had a roast challenge!
The only problem with this lamb roast is that it's not a leg of lamb -- which is the traditional lamb roast. A lamb belly is a wide, thin slab of meat. No biggie, I figure. I'll make a roulade-type thing and stuff it. And lucky me, but my whole meal wound up being recipes printed back to back!

 Hmm, see stuffing under braised mutton?
 And thus, my whole meal was easily planned with back-to-back recipes.
 Roundup:
The Challenge: Roasts
The Recipe: Lamb Bretonne (Roast Lamb, Stuffing, Beans Bretonne)
The Date/Year and Region: 1922 edition of The Boston Cooking-School Cook Book by Fannie Merritt Farmer, published Boston, MA
How Did You Make It: The alterations I made to the roast lamb were to a) make it a roulade (omg I officially hate tying up a round roast soooo much!) b) stuff it and c) instead of using a rack I used porcelain chopstick rests. I also never noticed the flour browning (I'm cooking at 350F), so I basted it with smaltz starting at an hour in.
The alterations I made to the stuffing were to use corn flake crumbs instead of cracker crumbs, and to use a mix of spices instead of poultry seasoning. (Oregano, Rosemary, Nutmeg, Cayenne) The alterations I made to the Beans Bretonne were to use one pickled pepper snagged from a pickle jar and some red pepper flakes instead of the six canned pimentos.
Time to Complete: overnight soaking for beans, cooking beans for 2 hours during the day, and then 30 mins prep for beans and 2 hours cooking. 10 mins prep for lamb, 1 3/4 hours cooking for lamb. 5 mins cooking for gravy. Not very much ACTIVE cooking.
Total Cost: $9.90 for the lamb. Everything else was in storage.
How Successful Was It?: Pretty tasty! The lamb was tastiest with lamb + stuffing + gravy + beans/tomato sauce. It was a little too dry otherwise.
How Accurate Is It?: I'd say pretty accurate. All of my alterations are fairly normal ones.
And a final comment from my husband: We should make this again, but with an actual roast, not the stuffed one. And serve it with biscuits. Maybe cheesy ones? (*hopeful face)
Roundup:
The Challenge: Roasts
The Recipe: Lamb Bretonne (Roast Lamb, Stuffing, Beans Bretonne)
The Date/Year and Region: 1922 edition of The Boston Cooking-School Cook Book by Fannie Merritt Farmer, published Boston, MA
How Did You Make It: The alterations I made to the roast lamb were to a) make it a roulade (omg I officially hate tying up a round roast soooo much!) b) stuff it and c) instead of using a rack I used porcelain chopstick rests. I also never noticed the flour browning (I'm cooking at 350F), so I basted it with smaltz starting at an hour in.
The alterations I made to the stuffing were to use corn flake crumbs instead of cracker crumbs, and to use a mix of spices instead of poultry seasoning. (Oregano, Rosemary, Nutmeg, Cayenne) The alterations I made to the Beans Bretonne were to use one pickled pepper snagged from a pickle jar and some red pepper flakes instead of the six canned pimentos.
Time to Complete: overnight soaking for beans, cooking beans for 2 hours during the day, and then 30 mins prep for beans and 2 hours cooking. 10 mins prep for lamb, 1 3/4 hours cooking for lamb. 5 mins cooking for gravy. Not very much ACTIVE cooking.
Total Cost: $9.90 for the lamb. Everything else was in storage.
How Successful Was It?: Pretty tasty! The lamb was tastiest with lamb + stuffing + gravy + beans/tomato sauce. It was a little too dry otherwise.
How Accurate Is It?: I'd say pretty accurate. All of my alterations are fairly normal ones.
And a final comment from my husband: We should make this again, but with an actual roast, not the stuffed one. And serve it with biscuits. Maybe cheesy ones? (*hopeful face)

Roast Lamb A leg of lamb is usually sent from market wrapped in caul; remove caul, wipe meat, sprinkle with salt and pepper, place on rack in dripping-pan, and dredge meat and bottom of pan with flour. Place in hot oven, and baste as soon as flour in pan is brown, and every fifteen minutes afterwards until the meat is done, which will take about one and three-fourths hours. It may be necessary to put a small quantity of water in pan while meat is cooking. Leg of lamb may be boned and stuffed for roasting. See stuffing, under Braised Mutton. Make gravy, following directions for Roast Beef Gravy on page 202, or serve with Currant Jelly Sauce.
 Hmm, see stuffing under braised mutton?
Stuffing 1 cup cracker crumbs, 1/4 cup melted butter, 1/4 tsp salt, 1/8 teaspoon pepper, 1/2 tablespoon Poultry Seasoning, 1/4 cup boiling water.Directions for gravy on page 202?
Roast Beef Gravy. Remove some of the fat from the pan, leaving four tablespoons. Place on front of range, add four tablespoons flour, and stir until well browned. The flour, dredged and browned in pan, should give additional color to gravy. Add gradually one and one-half cups boiling water, cook five minutes, season with salt and pepper, and strain. If flour should burn in pan, gravy will be full of black particles.Well that looks like it'll be tasty. But let's cast our eyes over more of this chapter to make sure I picked the right recipe for tonight. Hmm, what's this "Lamb Bretonne"...?
Lamb Bretonne Serve hot thinly sliced roast lamb with Beans Bretonne. Soak one and one-half cups pea beans over night in cold water to cover, drain, and parboil until soft; again drain, put in earthen-ware dish or bean pt, add tomato sauce, cover, and cook until beans have nearly absorbed sauce. Tomato Sauce. Mix one cup stewed and strained tomatoes, one cup white stock, six canned pimentoes rubbed through a sieve, one onion finely chopped, two cloves garlic finely chopped, one-fourth cup butter, and two teaspoons salt.
 And thus, my whole meal was easily planned with back-to-back recipes.
 Roundup:
The Challenge: Roasts
The Recipe: Lamb Bretonne (Roast Lamb, Stuffing, Beans Bretonne)
The Date/Year and Region: 1922 edition of The Boston Cooking-School Cook Book by Fannie Merritt Farmer, published Boston, MA
How Did You Make It: The alterations I made to the roast lamb were to a) make it a roulade (omg I officially hate tying up a round roast soooo much!) b) stuff it and c) instead of using a rack I used porcelain chopstick rests. I also never noticed the flour browning (I'm cooking at 350F), so I basted it with smaltz starting at an hour in.
The alterations I made to the stuffing were to use corn flake crumbs instead of cracker crumbs, and to use a mix of spices instead of poultry seasoning. (Oregano, Rosemary, Nutmeg, Cayenne) The alterations I made to the Beans Bretonne were to use one pickled pepper snagged from a pickle jar and some red pepper flakes instead of the six canned pimentos.
Time to Complete: overnight soaking for beans, cooking beans for 2 hours during the day, and then 30 mins prep for beans and 2 hours cooking. 10 mins prep for lamb, 1 3/4 hours cooking for lamb. 5 mins cooking for gravy. Not very much ACTIVE cooking.
Total Cost: $9.90 for the lamb. Everything else was in storage.
How Successful Was It?: Pretty tasty! The lamb was tastiest with lamb + stuffing + gravy + beans/tomato sauce. It was a little too dry otherwise.
How Accurate Is It?: I'd say pretty accurate. All of my alterations are fairly normal ones.
And a final comment from my husband: We should make this again, but with an actual roast, not the stuffed one. And serve it with biscuits. Maybe cheesy ones? (*hopeful face)
Roundup:
The Challenge: Roasts
The Recipe: Lamb Bretonne (Roast Lamb, Stuffing, Beans Bretonne)
The Date/Year and Region: 1922 edition of The Boston Cooking-School Cook Book by Fannie Merritt Farmer, published Boston, MA
How Did You Make It: The alterations I made to the roast lamb were to a) make it a roulade (omg I officially hate tying up a round roast soooo much!) b) stuff it and c) instead of using a rack I used porcelain chopstick rests. I also never noticed the flour browning (I'm cooking at 350F), so I basted it with smaltz starting at an hour in.
The alterations I made to the stuffing were to use corn flake crumbs instead of cracker crumbs, and to use a mix of spices instead of poultry seasoning. (Oregano, Rosemary, Nutmeg, Cayenne) The alterations I made to the Beans Bretonne were to use one pickled pepper snagged from a pickle jar and some red pepper flakes instead of the six canned pimentos.
Time to Complete: overnight soaking for beans, cooking beans for 2 hours during the day, and then 30 mins prep for beans and 2 hours cooking. 10 mins prep for lamb, 1 3/4 hours cooking for lamb. 5 mins cooking for gravy. Not very much ACTIVE cooking.
Total Cost: $9.90 for the lamb. Everything else was in storage.
How Successful Was It?: Pretty tasty! The lamb was tastiest with lamb + stuffing + gravy + beans/tomato sauce. It was a little too dry otherwise.
How Accurate Is It?: I'd say pretty accurate. All of my alterations are fairly normal ones.
And a final comment from my husband: We should make this again, but with an actual roast, not the stuffed one. And serve it with biscuits. Maybe cheesy ones? (*hopeful face)
Wednesday, March 2, 2016
Couture Design
My student Y is taking a course on Couture Design, as the final construction course before she starts her year-long senior project as a Fashion Design major. We've been having so much fun, all the hand-sewing, and with 14 yards of silk draped across us... I've been taking pictures of course, as it's been such a treat.
 Here's the general idea for the skirt. This is merely pinned onto the mannequin, I think we'll actually sew it to the waistband today.
 Lookit all the pretty fabric! We were handstitching the second hem, encasing the horsehair braid (one side has 6" braid, the other has 3" braid -- and it's all invisibly handsewn).
 A closeup shot of the stitching for the hem. It winds up going pretty fast, for all that it seems to take forever!
 And this is the top that accompanies it. We finished it yesterday (although the hem needs adjustment. It was finicky and some of the bones are a little too long). This is the second top design, and it's roughly based off of a dress that Y's mother made for a client. The initial top design was going to use a tshirt with the cover art of Le Petit Prince that had been embellished by embroidery and beading.
 Comme ça. This particular stitch is whipped back stitch, in silver metallic thread.
Sunday, February 14, 2016
HFF: Sweets for the Sweet
4. Sweets for the Sweet (February 12 - February 25) It’s sugar, and maybe spice, and definitely everything nice. Test out a historic recipe for sweets, sweetmeats and candies - but don’t let them spoil your appetite!
Today was a pretty easy shoe-in for this challenge. I had a very close friend and her 3.5 year old daughter over to "test" a new cake pan I bought, shaped like a dragon. We also had the daughter's very first Big Girl Tea Party.
 I forgot to take a pic of the cake (although it was displayed to all with much ooh-ing and aah-ing), so here is a stock photo. But my cake came out quite comparably, although I didn't have enough batter to fully fill the pan, so it was a small dragon with no bed to sleep on.
Roundup:
The Challenge: Sweets for the Sweet
The Recipe: Newport Pound Cake
The Date/Year and Region: The Boston Cooking-School Cook Book by Fannie Merritt Farmer, Boston, MA, USA 1934
How Did You Make It:
Newport Pound Cake
-- 7/8 c. butter
-- 1 1/2 c. flour
-- few grains salt
-- 5 eggs
-- 1 1/2 c. powdered sugar
-- 1 tsp. vanilla
-- 1 tsp. baking powder
Cream butter, add flour gradually. Beat egg whites until stiff but not dry, and beat in half the sugar, salt, and vanilla. Beat egg yolks until thick and lemon-colored, add remaining sugar gradually, and add to butter and flour. Beat well. Fold egg whites into mixture. Sift over baking powder. Beat thoroughly. Bake 1 hour in moderate oven (350ºF) in buttered deep pan.
Time to Complete: 2 hours including baking
Total Cost: $0 all was already in house
How Successful Was It?: This was the first time I'd ever added the FLOUR to the creamed butter. It was interesting. The amount of having to move mixtures around so they could get under my mixer was a mild inconvenience, but the toddler helping me thought it was GREAT. Also, I only had 3 eggs, AND punctured one of the yolks. So I was only able to beat 2 egg whites, and I threw two tablespoons of mayo as egg substitute for the other two needed. My cake probably didn't rise as much as it should have. As stated, it didn't completely fill my cake pan, so I wound up with a small cake. I perhaps overbaked it, but even so, it had a very tender crumb. Really, one of the better "pound cake" type cakes I've ever baked.
Also, I oiled and then floured the pan so that the design came out well. Again, this worked wonders and my cake design came out perfectly. Nothing stuck to the pan.
How Accurate Is It?: I don't know if that was a common egg substitute in the 30s, but otherwise, everything turned out well and quite accurately.
I forgot to take a pic of the cake (although it was displayed to all with much ooh-ing and aah-ing), so here is a stock photo. But my cake came out quite comparably, although I didn't have enough batter to fully fill the pan, so it was a small dragon with no bed to sleep on.
Roundup:
The Challenge: Sweets for the Sweet
The Recipe: Newport Pound Cake
The Date/Year and Region: The Boston Cooking-School Cook Book by Fannie Merritt Farmer, Boston, MA, USA 1934
How Did You Make It:
Newport Pound Cake
-- 7/8 c. butter
-- 1 1/2 c. flour
-- few grains salt
-- 5 eggs
-- 1 1/2 c. powdered sugar
-- 1 tsp. vanilla
-- 1 tsp. baking powder
Cream butter, add flour gradually. Beat egg whites until stiff but not dry, and beat in half the sugar, salt, and vanilla. Beat egg yolks until thick and lemon-colored, add remaining sugar gradually, and add to butter and flour. Beat well. Fold egg whites into mixture. Sift over baking powder. Beat thoroughly. Bake 1 hour in moderate oven (350ºF) in buttered deep pan.
Time to Complete: 2 hours including baking
Total Cost: $0 all was already in house
How Successful Was It?: This was the first time I'd ever added the FLOUR to the creamed butter. It was interesting. The amount of having to move mixtures around so they could get under my mixer was a mild inconvenience, but the toddler helping me thought it was GREAT. Also, I only had 3 eggs, AND punctured one of the yolks. So I was only able to beat 2 egg whites, and I threw two tablespoons of mayo as egg substitute for the other two needed. My cake probably didn't rise as much as it should have. As stated, it didn't completely fill my cake pan, so I wound up with a small cake. I perhaps overbaked it, but even so, it had a very tender crumb. Really, one of the better "pound cake" type cakes I've ever baked.
Also, I oiled and then floured the pan so that the design came out well. Again, this worked wonders and my cake design came out perfectly. Nothing stuck to the pan.
How Accurate Is It?: I don't know if that was a common egg substitute in the 30s, but otherwise, everything turned out well and quite accurately.
Thursday, February 11, 2016
HFF: History Detective
 Cue the world's ugliest looking meal
3. History Detective (January 29 - February 11) For this challenge, you get to be the detective! Either use clues from multiple recipes to make a composite recipe, or choose a very vague recipe and investigate how it was made.
I opted to make a soufflé from Traité General de la Cuisine Maigre by August Helié (1897). Original text:
Cue the world's ugliest looking meal
3. History Detective (January 29 - February 11) For this challenge, you get to be the detective! Either use clues from multiple recipes to make a composite recipe, or choose a very vague recipe and investigate how it was made.
I opted to make a soufflé from Traité General de la Cuisine Maigre by August Helié (1897). Original text:
Soufflé à la Parmentier:My translation:
Beurrez un moule à Charlotte grassement, chemisez-le légèrement avec de la chapelure blonde; faites cuire des pommes de terre à la vapeur ou au four; lorsqu'elles sont cuites, les passer au tami, les beurrer en les maniant à la cuillère dans une casserole, leur adjoindre une bonne poignée de fromage de gruyère râpé trois jaunes et trois blanc fouettés; emplissez votre moule et faites-le cuire à four modéré; lorsqu'il est cuit, démoulez-le sur un plat et arrosez-le avec du beurre noisette.
Soufflé à la Parmentier: Butter a Charlotte mold well, cover lightly with breadcrumbs; cook the potatoes either by steaming or baking in the oven; when they're done, run them through a sieve, butter them with a fair amount of butter [E.N. direct translation is apparently "butter them with the amount wielded in a spoon in a pot" so I'm going with a cooking spoon's worth of butter], mix them with a good handle [E.N. HA!] of grated gruyère, three yolks and three whipped egg whites; place them in your mold and cook it in a moderate oven; when it's cooked, unmold it onto a plate and sprinkle with hazelnut butter.So, for all that I own many many useless (or single use) kitchen items, I do not own a Charlotte mold, or a large-size soufflé pan. (I own mini ones!) So I'm using a round clay cooking thingamer. I buttered it really heavily, then dusted it with corn flake crumbs (don't have breadcrumbs). I baked two good-sized baking potatoes (the size I'd be overjoyed to get at a steakhouse), and rubbed them through a steel strainer with a wooden spoon. I have to say, I'm a fan of this method of making potatoes. I'm considering investing in a potato ricer, as it makes a lovely texture. I put a large blob of butter (probably 2 tablespoons at least) in with the hot potatoes, and started dealing with the difficult items. I grated the gruyère (Husband only found smoked, so smoked it is), about 1.5 oz, and added that to the potatoes. I separated my eggs, and put the yolks straight in with the potatoes. Then I started beating the eggs. I wanted them somewhere between soft and stiff peaks, and I hate using the stand mixer for something small like this. Famous last words. I DID discover that twirling the whisk between my hands is much more energy efficient than the traditional whipping motion. But halfway through, I tagged my husband in. And so while he finished beating the eggs, I mixed everything else together. When the eggs were whipped, I folded them into the potato mixture, and put it into my baking container -- evening out the top. I then put it in the still-heated-from-potatoes oven at 350F. As I write this, it is still in the oven. I'll post an update, but I'm so excited about this I want to post early. Amusingly, but not surprisingly, my husband both wished we could stick a whisk in the cordless drill (ha!), and said that we should get an egg beater. I've long wanted one, but have so rarely needed one... This is one of the many reasons why I love my husband. :-D UPDATE: It is delicious! Nice and potato-y. Smells more cheesy than it tastes. The hazelnut would have gone well, as it's a little dry. But light and fluffy! I've never made soufflé, and they're rumoured to be difficult, but this was a success! Also, didn't have the huge dome of soufflé that I was expecting, but I am in no way upset with my meal. 10/10 would make and eat again. Roundup: The Challenge: History Detective The Recipe: Soufflé à la Parmentier The Date/Year and Region:France, 1897 How Did You Make It: see above Time to Complete: 75 mins for baking potatoes, 35 mins for prep time, 40 for baking soufflé Total Cost: $6.99 for Gruyère, $4.89 for eggs, everything else was in the house already How Successful Was It?:DELICIOUS. Although it stuck to the bottom of the pan when I tried to unmold it, and my foolish decision to NOT photograph it while in the baking container means that I only have ugly pictures. How Accurate Is It?: I'm skipping the hazelnut butter, but otherwise everything is pretty reasonable. It was also all made by hand, so achievable for the average kitchen in 1897.
Contenders for HFF
Because I have this problem (lookit the humblebrag coming up) where I read antique cookbooks like novels regularly, I am very rarely confused by their instructions. The fact that my family has generally not used measurements in home cooking probably encourages such things. All of our family recipes are a list of ingredients, with no amounts or directions. ... Actually that's probably the reason for my facility with this...
Anywho, I decided that I would pick a French recipe from Traité General de la Cuisine Maigre by August Helié (published 1897 and found on Project Gutenberg). The translation would give me the detective part of this challenge, as I haven't taken French in ... a decade. I feel old. Amusingingly, reading this on my kindle while commuting for the past week must have been amusing for those around me as I mutter French under my breath and get really excited when I figure words out.
Here are my contenders!Well, the first got eliminated when I realized the word I didn't know was 'tortoise'. No matter if Indian-style Rice Croquettes otherwise sound delicious. Onto number two!
Gnochis au Gratin: Faites une pâte à choux commune au lait, dans laquelle vous y incorporez du fromage de parmesan râpé, beurrez un plat à sauter et faites des belles quenelles à la cuillère avec votre pâte; lorsque votre plat est plein, mouillez ces quenelles à l'eau bouillante et laissez-les pocher sur le coin du feu. Les égoutter sur un linge, ensuite les placer sur un plat a gratin, les napper avec une sauce au beurre dans laquelle vous y aurez introduit du parmesan râpé et un peu de paprica; semez par-dessus un peu de chapelure et quelques gouttes de beurre fondu; poussez au four pour le faire gratiner et servez.Number three!
Calecanom à l'Irlandaise: ** side note -- Colcannon is one of my all-time favorite meals, so this is high on my list.** Ayez des pommes de terre cuites et bien farineuses, brisez-les au moyen d'une fourchette, ajoutez-y un bon morceau de beurre et un cinquième d'herbe potagère bien hachée, le tout assaisonné de beurre, de sel, de poivre et de gingembre; ce mets est très substantiel et assez agréable, servez dans un plat à légumes en en formant un dôme, et l'arroser d'un beurre fondu.Number four!
Soufflé à la Parmentier: Beurrez un moule à Charlotte grassement, chemisez-le légèrement avec de la chapelure blonde; faites cuire des pommes de terre à la vapeur ou au four; lorsqu'elles sont cuites, les passer au tami, les beurrer en les maniant à la cuillère dans une casserole, leur adjoindre une bonne poignée de fromage de gruyère râpé trois jaunes et trois blanc fouettés; emplissez votre moule et faites-le cuire à four modéré; lorsqu'il est cuit, démoulez-le sur un plat et arrosez-le avec du beurre noisette.I'm less excited about the gnocchi, so I'll eliminate that for now (although I might try it eventually). The colcannon requires buying les "herbe potagères" which google tells me are potherbs. That actually does call for some recipe detective as I forget what potherbs are. I'm assuming greens. Especially as potagère alone means vegetable, although there was a secondary definition of beets. I'm also assuming greens because it's colcannon. ... It's just too easy for the colcannon. I've made literally every version of mashed potatoes + stuff that wikipedia lists. Looks like I'm going to try and make the soufflé! I need to buy gruyère, hazelnut butter and eggs. Amusingly, although I had assumed there'd be eggs in there, it being a soufflé and all, there is no mention of les oeufs. But "three yellows and three whites whipped", now that sounds like eggs. The question then becomes, do I own a Charlotte mold? I might have to make something up. Thursday's dinner will be delicious. :-D
Saturday, February 6, 2016
Clearing Some Tabs
Since my husband and I share computers (they're both his), I can't really keep tabs up for ever and ever. So here are some things:


 ^ cute way to do a bow neck
 source
 source
Matchstick Cookies
source
Matchstick Cookies


 Cute corselet with "panties" of silk georgette. The largest front and back petals button together. source
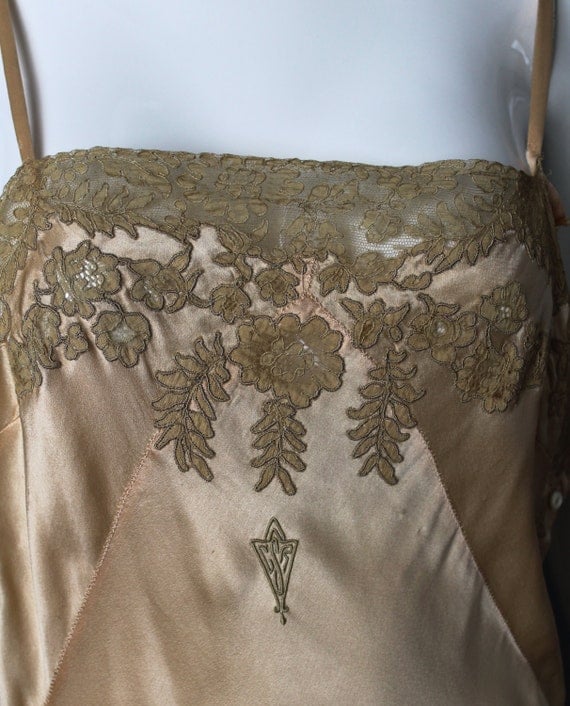
 "All dresses of this time [1913] started out with a boned belt to which everything was attached. This was snugly fitted and usually fastened on the left."
 "An underbodice, or guimpe, was attached first. This one has the sleeves in one with the body, kinono-style, which was in fashion at the time. Lace is attached where it will show, and the under fabric is pink silk georgette. The bodice snaps down the left side front, hooks securely to the belt, then the snaps continue around to the side. The rest of the bodice from the left front around the right and across the back to the left closure is attached to the belt."
 "Here is the back, showing the simple turned-under edge of the netting, which will not fray, and the georgette. This is gathered to a cotton twill tape and stitched to the belt."
 "Over the bodice goes this beautiful silk lace cape, edged with rose weighted silk, which covers the unfinished edges of the netting and meets at the middle front at the beltline. (I have it on inside out here, showing the seams.) Note how the lace is gathered at the bottom to make a drape at the waist. The other side has come unsewn. Look at the dresses for October 1911 and July 1911 at the link I provided above to see similar construction. It has been cut away at the front, but I believe it had been attached to the belt at center front and center back.
The other piece of this beautiful dress that remains is the top overskirt. The fronts are finished with the same rose weighted silk fabric. The underskirt, which is missing, probably was made of the rose weighted silk, which you can see is splitting very badly. This underskirt, like the bodice, would have been attached to the belt from the right side around the back to the side opening, and then finished with snaps to the front left.
To cover all the busyness at the waist, there would have been a boned sash, probably with long ends finished with lace or tassels."
"Over the bodice goes this beautiful silk lace cape, edged with rose weighted silk, which covers the unfinished edges of the netting and meets at the middle front at the beltline. (I have it on inside out here, showing the seams.) Note how the lace is gathered at the bottom to make a drape at the waist. The other side has come unsewn. Look at the dresses for October 1911 and July 1911 at the link I provided above to see similar construction. It has been cut away at the front, but I believe it had been attached to the belt at center front and center back.
The other piece of this beautiful dress that remains is the top overskirt. The fronts are finished with the same rose weighted silk fabric. The underskirt, which is missing, probably was made of the rose weighted silk, which you can see is splitting very badly. This underskirt, like the bodice, would have been attached to the belt from the right side around the back to the side opening, and then finished with snaps to the front left.
To cover all the busyness at the waist, there would have been a boned sash, probably with long ends finished with lace or tassels."
 "Notice how the lace is gathered at center back for more draping. This would have been a diaphanous floaty rustling party dress!"
 "The silk lace is still in excellent condition. The only material that is crumbling is the weighted silk, which is to be expected."
source
"The silk lace is still in excellent condition. The only material that is crumbling is the weighted silk, which is to be expected."
source
“I’m not a fucking genius. I work my ass off. Hamilton could have written what I wrote in about three weeks. That’s genius. It took me a very long time to wrestle this onto the stage, to even be able to understand the worldviews of the characters that inhabit my show, and then be able to distill that.” — Lin-Manuel Miranda
“Men give me credit for some genius. All the genius I have lies in this; when I have a subject in hand, I study it profoundly. Day and night it is before me. My mind becomes pervaded with it. Then the effort that I have made is what people are pleased to call the fruit of genius. It is the fruit of labor and thought.” — Alexander Hamilton


 ^ cute way to do a bow neck
 source
 source
Matchstick Cookies
source
Matchstick Cookies


 Cute corselet with "panties" of silk georgette. The largest front and back petals button together. source
 "All dresses of this time [1913] started out with a boned belt to which everything was attached. This was snugly fitted and usually fastened on the left."
 "An underbodice, or guimpe, was attached first. This one has the sleeves in one with the body, kinono-style, which was in fashion at the time. Lace is attached where it will show, and the under fabric is pink silk georgette. The bodice snaps down the left side front, hooks securely to the belt, then the snaps continue around to the side. The rest of the bodice from the left front around the right and across the back to the left closure is attached to the belt."
 "Here is the back, showing the simple turned-under edge of the netting, which will not fray, and the georgette. This is gathered to a cotton twill tape and stitched to the belt."
 "Over the bodice goes this beautiful silk lace cape, edged with rose weighted silk, which covers the unfinished edges of the netting and meets at the middle front at the beltline. (I have it on inside out here, showing the seams.) Note how the lace is gathered at the bottom to make a drape at the waist. The other side has come unsewn. Look at the dresses for October 1911 and July 1911 at the link I provided above to see similar construction. It has been cut away at the front, but I believe it had been attached to the belt at center front and center back.
The other piece of this beautiful dress that remains is the top overskirt. The fronts are finished with the same rose weighted silk fabric. The underskirt, which is missing, probably was made of the rose weighted silk, which you can see is splitting very badly. This underskirt, like the bodice, would have been attached to the belt from the right side around the back to the side opening, and then finished with snaps to the front left.
To cover all the busyness at the waist, there would have been a boned sash, probably with long ends finished with lace or tassels."
"Over the bodice goes this beautiful silk lace cape, edged with rose weighted silk, which covers the unfinished edges of the netting and meets at the middle front at the beltline. (I have it on inside out here, showing the seams.) Note how the lace is gathered at the bottom to make a drape at the waist. The other side has come unsewn. Look at the dresses for October 1911 and July 1911 at the link I provided above to see similar construction. It has been cut away at the front, but I believe it had been attached to the belt at center front and center back.
The other piece of this beautiful dress that remains is the top overskirt. The fronts are finished with the same rose weighted silk fabric. The underskirt, which is missing, probably was made of the rose weighted silk, which you can see is splitting very badly. This underskirt, like the bodice, would have been attached to the belt from the right side around the back to the side opening, and then finished with snaps to the front left.
To cover all the busyness at the waist, there would have been a boned sash, probably with long ends finished with lace or tassels."
 "Notice how the lace is gathered at center back for more draping. This would have been a diaphanous floaty rustling party dress!"
 "The silk lace is still in excellent condition. The only material that is crumbling is the weighted silk, which is to be expected."
source
"The silk lace is still in excellent condition. The only material that is crumbling is the weighted silk, which is to be expected."
source
Subscribe to:
Posts (Atom)